You’ve heard that 80 percent of adults will experience back pain in their lives. Chances are, you’ll work with some of them. While few trainers are qualified to diagnose or treat back problems, every trainer can make it better by developing their clients’ core stability.
In fact, this is the first thing I tell those clients: Stop stretching your lower back.
Stretching aids mobility, and if the pain is rooted in instability—abnormal movement between the vertebrae—then moving the area more is not going to help.
For that, you need safe, low-intensity exercises to improve three aspects of core stability:
- Lumbar-spine positional awareness
- Motor control
- Glute strength
At best, you’ll help ease your client’s low-back pain, and at worst, you’ll do no harm.
READ ALSO: Seven Myths About Low-Back Pain
1. Lumbar-spine positional awareness
The strategy: Find a neutral spine
Poor posture is linked to back pain. So it makes sense that poor posture awareness is as well. You have to be aware of problematic patterns before you can fix them.
The trick is to encourage your client to focus on what he’s feeling. Because you can’t see your low back during exercise, you have to feel what’s happening back there instead.
That learning process is best done while lying on the floor or a treatment table. This provides support and allows for instant tactile feedback from the low back and hips.
The following sequence is designed to help your client find a neutral spine position. As you walk your client through it, be sure to check in with him to see if the pain is the same, better, or worse.
Your cues:
- “Using your hips, arch your back up away from the floor.” If your client looks at you like you just asked him to solve for X, tell him to arch his back enough for you to slide a hand underneath.
- “How does your back feel?”
- “Now press your low back flat against the floor.” If you actually did slide your hand under his low back—I often do—you can cue him to squish your hand.
- “How does your back feel?”
- “Now arch your back slightly, and brace your abs like I’m going to punch you in the stomach. Don’t hold your breath, just brace for a punch.” (At this point, I like to haul back and give the client a threatening look. It’s one of the little jokes that helps me through a long day of training.)
Typically, a neutral spine eliminates or significantly reduces the pain and, in my experience, gives the client hope that pain management is possible. Most people find that a flatter back position (posterior pelvic tilt) feels better. But keep in mind that a neutral spine may look a bit different for each person.
CRITICAL DETAIL: Have your client focus on being deliberate with the movements. If your client is distracted and going through the motions without intention, he’s wasting his time (and yours). But if your client is deliberate, he stands to benefit greatly.
READ ALSO: How to Train Around Five Common Causes of Pain
2. Motor control
The strategy: Perform core-stability moves
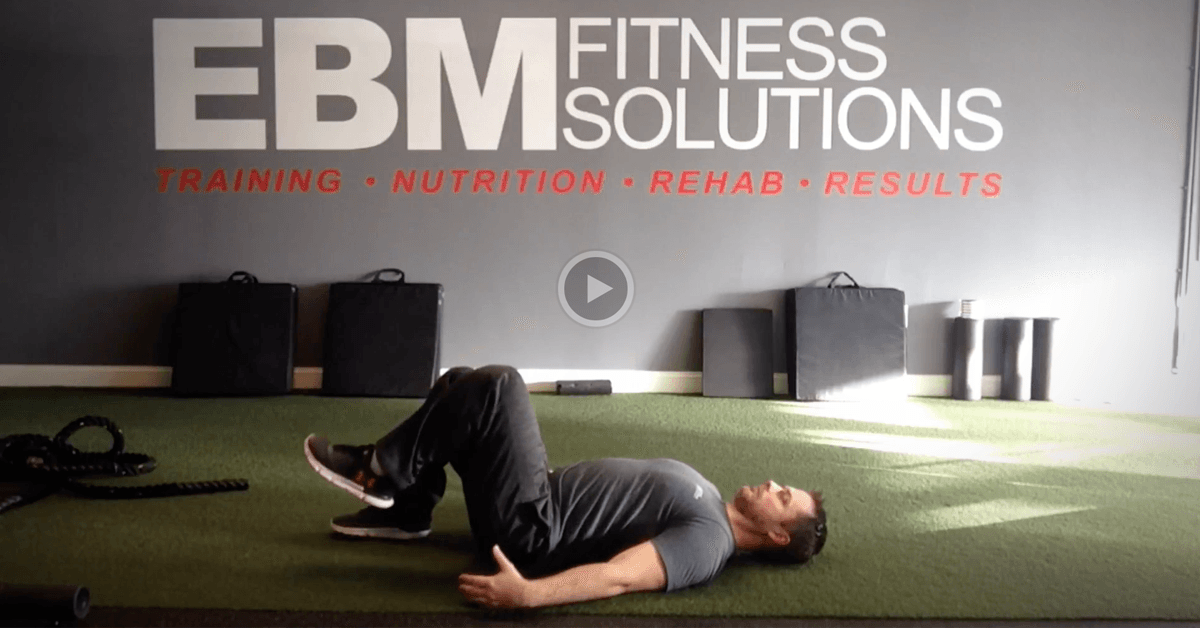
Core stabilization gets at the root of the problem for most types of back pain. After all, the abdominals’ primary job is to stabilize the lower back. So let that be your focus during the three movements shown in the video below.
All three moves are done lying on the floor, starting from a neutral spine position. When setting this position, make sure the ankles, knees, and hips are aligned. Placing the feet too close or too wide can promote movement in the low back. Remember, when the hips move, so does the low back.
Bracing and marching
- Move slowly and deliberately. Cue your client to focus on the brace, especially when switching legs.
- Don’t march too high. The core will be challenged as soon as the foot leaves the ground, and marching too high may alter the low-back position.
- Keep a neutral spine throughout. If your client loses the neutral position, have her stop and reset. Don’t let her keep marching while you check Instagram.
Bracing with arms overhead
- Don’t arch the back. If your client can’t touch her hands to the floor without arching her back, have her go as low as she can without arching.
- Don’t let the hips rock. This means that the client isn’t stabilizing properly. Cue her to focus on the brace.
Bracing with alternating flies
- Don’t let the hips rock. Again, this means the client isn’t stabilizing. Have her brace hard to keep her hips still during the upper-body movement.
- Press shoulder blades into the floor. As each arm moves out to the side, make sure the opposite shoulder blade stays down. The goal is core stabilization, not shoulder range of motion.
CRITICAL DETAIL: Keep sets shorter and more frequent. (Think 10 sets of three, not three sets of 10.) This is how you improve motor control. Your client may be inclined to get into a groove and just keep going. Discourage this. Limit reps to five, max, and after each set, have the client stop and rest for a few seconds. Then walk her through the sequence of finding a neutral spine before beginning the move again.
READ ALSO: Five Steps to Superior Core Training
3. Glute strength
The strategy: Start with the bridge
People with low-back pain often have weak glutes. To shore up those muscles, I like to start with the glute bridge. The classic move is not only a useful assessment tool but also a low-risk way to teach glute engagement while training core stability.
But there is one catch: Teaching the bridge to clients with low-back pain often triggers the pain, at least initially. That’s because they tend to lose their neutral position as soon as they raise the hips.
Here’s how I explain it to my clients:
“When you’re lying down, your body is supported by the ground. Most of your muscles are relaxed. If you struggle to maintain your neutral spine when you’re lying down, you have zero chance of doing it when you’re sitting, standing, walking, bending, twisting, or lifting.”
This helps illustrate how critical these exercises are, not just in the gym, but in all aspects of your life.
READ ALSO: Don’t Let Your Clients Butcher These Three Exercises
When setting up the bridge, don’t neglect any details. They all matter. For a quick video tutorial, click here.
- Get the client into a hook-lying position (a fancy name for the bridge’s starting position): lying down with the knees bent and feet flat on the floor.
- Make sure the ankles, knees, and hips are aligned.
- Walk your client through the sequence of finding a neutral spine position. The final step—the ab brace—is vital. It helps the client maintain a neutral spine throughout the move.
- Press the heels into the floor and squeeze the glutes. At this point, that might be all the client can do. If that’s the case, you’ll simply have the client alternate squeezing and relaxing the glutes while keeping the abs braced.
- If the client is able to move even partway through the bridge without pain, instruct him to move only through pain-free motion. Stop just short of pain, even if that’s barely high enough to slide a piece of paper underneath.
- On the lowering phase, the glutes can relax briefly, but the abs must stay tight. The only reason to relax the abs is to restart the neutral-spine sequence, not a bad idea from time to time.
A common mistake: Many people will push through their toes instead of their heels, engaging the quads more and causing horizontal movement. To fix this, you can slide a foam roller under the upper back. (Check out this video for setup and execution.) If the client pushes with his toes, the roller will move. Just keep in mind this does allow for a slightly greater range of motion.
CRITICAL DETAIL: Manage fatigue. It’s not uncommon for my clients to do just two or three sets of three reps. That may sound absurd, but when the goal is pain-free movement, quality-over-quantity is the best approach. You may need to be the voice of reason. A motivated client is great at hard work, but not restraint. Your job in these cases isn’t to push your client but to slow him down.
READ ALSO: Why “Safe” Exercises Aren’t Safe for Every Client
Final thoughts
Treating lower-back pain is a bear. It doesn’t resolve quickly, and anyone who says otherwise is lying to you or someone you know.
The strategies above may take weeks or months to resolve the issue. But in the meantime, if done properly, they’re unlikely to increase the pain.
However, if you don’t feel comfortable trying them, then don’t. Refer out. Build your network and reach out to physical therapists or other clinicians in your area.
Years ago, anytime I had a client referral from a physical therapist, I would call the therapist and ask questions. The clients loved it. It made them feel as if they were being taken care of. And more important, they were.


