
The hip hinge is one of the fundamental movements of a lot of programs, and one of the most effective ways of building lower body strength. It's a staple of deadlifts, squats, and anything that requires explosiveness, like olympic lifting, sprinting, and various *ahem* recreational activities.
A big problem a lot of people get into is figuring out how to get the hips to move without getting the low back to flex along with it. The lumbopelvic disassociation is a common limiting factor, but a major one to overcome if you want to hoist many pounds against the pull of gravity without unzipping your spine from your torso and causing everyone of your friends to unfollow you on the Twitters.
The hip hinge is essentially limiting the movement potential of the entire system to having all flexion and extension driven from the hip joint. The goal is to have the spine stay neutral throughout the entire movement.
Let's take the classic deadlift for example. It's a movement where ideally the spine stays neutral, avoids going into flexion during the pull phase, and the movement is performed by having the hips go from flexion into extension. This is an example of a solid looking deadlift. Notice the hips and how they play with the spine.
Breaking Down the DeadliftInteresting anecdotal story:Years back a Roman general needed to figure out a way for his young soliders to stop getting hurt clearing away dead bodies from the battlefield.As the story goes, he taught them proper lifting technique, and the deadlift was born. So yes, the name literally comes from learning how to lift the dead.55 Reasons Why the Deadlift is the Best Exercise of All Time here: http://www.theptdc.com/2014/02/deadlift-exercise/**********This video is property of Somerset Fitness & Marketing, LLC and is used with permission. Learn More about Dean Somerset at www.deansomerset.com and subscribe to him on YouTube at www.theptdc.com/deanyoutube
Posted by Personal Trainer Development Center on Tuesday, February 3, 2015
Now watch a fantastic example of someone who does not have said control of said lumbopelvic complex during said deadliftery.
I think he may have pooped out his kidney on at least one of those rows near the end.
Now the tricky part comes when you try to teach a hip hinge pattern to someone who sits for the majority of their day. Office workers tend to spend roughly 8-10 hours a day in the seated position, which initially would sound like a good thing when it comes to teaching the hip hinge, as they're sitting with their hips at 90 degrees all day, right?
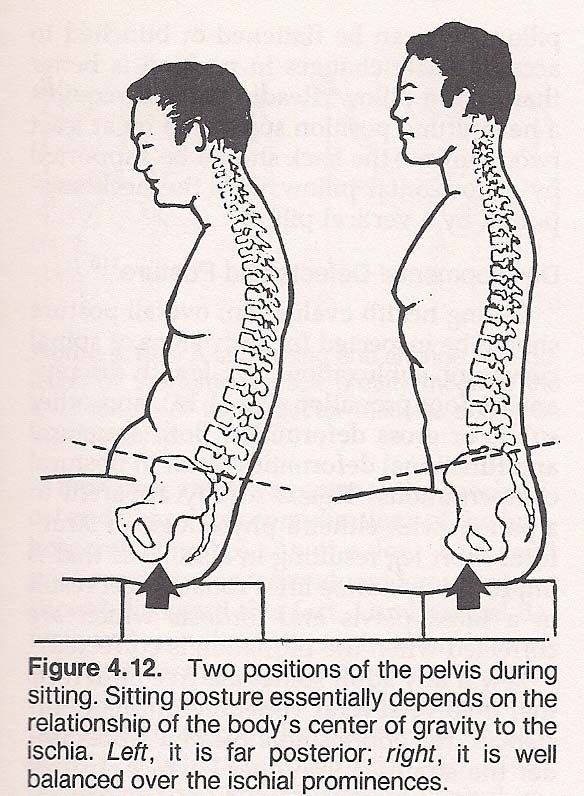
Almost. Most people tend to slouch and roll their pelvis to have more of a posterior tilt to it, which means they're sitting with less than 90 degrees of hip flexion and more than zero degrees of spinal flexion as a result.
This kind of posture tends to have a direct negative effect on the ability to hip hinge, as the person wants to always initiate the movement through spinal flexion instead of through hip flexion. The issue with this is that the low back muscles are designed to be more short movement, slow contraction, and long duration holders versus the glutes, who are designed to get the job done. Switching a tonic muscle of the low back and making it do the work of a phasic muscle like the hips tends to make for a sub-par lift and a potential injury waiting to happen.
Sitting on the back ends of the ischial tuberosites (your sit bones) tends to cause the pelvis to roll and push the spine into flexion, which makes your spine hate you and your entire family.
As a result, some people have to take it a step back and work on some remedial hip hinge work before they can step up to the bar and start tossing around more plates than a dishwasher at Dennys. Today I wanted to show you a ground-up progression for getting you from broken to bad ass when it comes to performing the world's most sick and twisted hip hinge ever.
A hip hinge requires more than just sticking your butt out into the middle of the room, although that's in there in good amounts too. One of the requisites to performing a bang-on perfect hip hinge is the ability of the core to maintain that stable and neutral spinal posture without going into flexion and without over extending.
This means that core training has to go into any kind of hip hinge workout, but I'm not talking about simple crunches and stuff like that. I'm talking about staples like dead bugs and planks and crazy stuff where you have to keep your spine from moving while throwing down some serious action on it.
The stability plank:
The Best Plank You've Never DoneWant to improve stability, increase the core challenge, and reduce hip tightness all in one.The stability plank is all about how much for you can generate.Note that in this video PTDC coach Dean Somerset is squeezing the glutes and cranking on the lats as hard as possible.Learn more about this plank at http://www.theptdc.com/2015/01/planks-the-magic-sauce-to-fix-hip-tightness-increase-mobility/---This video is property of Somerset Fitness & Marketing, LLC and is used with permission. Learn More about Dean Somerset at www.deansomerset.com and subscribe to him
Posted by Personal Trainer Development Center on Tuesday, January 20, 2015
The dead bug:
Master the Hip Hinge
Once you have some core stability, we can start using it in a basic hip hinge progression that takes a person from a fully supported and unresisted position into a full deadlift with copious amounts of mind numbingly heavy weights.
Step one is to get the hips to move while maintaining the spinal position, while kneeling and with both hands on the ground. This is a simple hip rocker, and is designed to get the hips moving without using the spine to create additional range of motion or losing the neutral stability of the core.
Better Hip Mobility For a Deeper SquatTry quadruped hip rockers to improve your squat depth. Aim to get your butt as close to your heels as possible, and complete with a controlled tempo. Be sure to keep a neutral spine (i.e. not round your back) throughout, as demonstrated by Dean Somerset.---This video is property of Somerset Fitness & Marketing, LLC and is used with permission. Learn More about Dean Somerset at www.deansomerset.com and subscribe to him on YouTube at www.theptdc.com/deanyoutube
Posted by Personal Trainer Development Center on Monday, July 13, 2015
Stopping the movement at the point where the spine starts to round is where the money is on this one. If that's too easy and you want a challenge, you could upgrade to the bear squats, which is still a 4 point hip hinge, but now is just off the hands and toes.
Help With the Squatting Pattern.The Bear Squat is a great way to train the squat in a low position. It simulates squatting through the legs but with 4 points of contact on the ground, not two. Use this when you're trying to get comfortable in a low squat position.Yet another great teaching tool from Dean.========This video is property of Somerset Fitness & Marketing, LLC and is used with permission. Learn More about Dean Somerset at www.deansomerset.com and subscribe to him on YouTube at www.theptdc.com/deanyoutube "” with Dean Somerset.========Personal trainer?Learn how thePTDC can help you become more successful here (it's free): www.theptdc.com/about-us/
Posted by Personal Trainer Development Center on Saturday, May 9, 2015
For both of these, the glutes aren't the driving force, but the goal is to get the hips to move without involving the spine. From here we can make the glutes the drivers. The basic version of this is a glute hip bridge, focusing on getting the hips to do all the extension instead of letting it come from the low back or hamstrings. The best way to do this is to make sure the pelvis stays neutral and doesn't wind up tilting forward, which would use both the hamstrings and low back to get the elevation.
From here, we can increase the range of motion by propping the shoulders up on a bench, and even play with the time under tension by adding in a half rep if we're feeling extra masochistic.
From there, you could go a little crazy and do it with just one leg.
Now that you've managed to master the ground based hip hinge, we can progress up to using some standing postures. It's gonna be tight, y'all!!!!
We'll start with a very basic wall tap hip hinge. The movement here is a horizontal one instead of vertical, so learning how to get the hips to press back and forth instead of thinking of lifting up and down makes it much easier to get the hips to drive the work instead of the knees and low back.
Again, remember to keep the core engaged so that you aren't extending from the spine to tap the wall. Once the person can get a good throw out of their hips while trying to touch the wall, we can increase the load and possibly the hopes of getting a bigger range of motion too. We can start with a light load held at the back of the head in the form of a kettlebell, light dumbell, plate, or any inanimate object. Maybe Kanye's new album would work. It's heavy and pretty useless, so it would work well.
I prefer to have the weight behind the head as it teaches them to get more thoracic extension. One thing to consider is whether the head is coming forward and down or not, and to try to prevent this. Keeping the neck in neutral will help to keep the low back neutral. If the person has some sickly tight shoulders, they can hold a weight in front of them on their chest, but it's going to be more likely that they will round their shoulders when they try to lower the weight instead of try to drive the hips back, so be aware of that.
Next, we can add a little unilateral loading to those bad boys. This is one I picked up from Mike Reinold from his recent contribution to the Functional Stability Training series with Eric Cressey, and I thought it was awesome. Kneeling on a foam roller, load one hip by using a stick and a single cable attachment pulling on one side. Press the hips forward and back without rotating the hips, and make sure your quads are hating existence from the deep stretch at the top of the movement and you're ready to crack some diamonds with your cheeks.
After this, we can start some modest deadlifting with a light kettlebell between the feet. I prefer this version to a barbell when learning as the weight can be held closer to the center center of gravitty than a barbell, which puts less pressure on the spine. There's also much less of a tendency to try to go around the bar as it sits in front of the knees, which means you won't see as much reaching for the bar as it travels past the knees. This is common when the person is trying to do more of a knee driven deadlift than a hip driven deadlift.
Anyways, on to the kettlebell deadlift.
I'd love to say this was flawless, but I was using way too much knee in the movement and was essentially squatting it instead of deadlifting, but the spine was on point.
Now funny enough, before progressing onto more loads or a bar or anything like that, I've found better results from teaching a single leg deadlift after a kettlebell deadlift. It helps to get much more of an awareness of what the spine and hips are doing and where everything is in space, plus it encourages posture and balance while working each leg independently.
Think of this one as a standing hamstring stretch instead of thinking about lowering the weight to the ground. This helps to keep the spine from rounding and makes the hip do all the work. Additionally, focus on keeping the glute of the elevated leg smashed hard and tight to keep the hips rotating properly.
To go with the single leg deadlift, I've had some great success in using a cable pullthrough to get people smashing their glutes like they're trying to have their underwear go missing in Death Valley and need to send out a search party of six to find it.
Mind the manly bits.
From here we can start increasing the tension in those glutes of steel. We'll bring in the kettlebell swing as it can again keep the weight fairly close to the center of gravity and reduce the lever arm working on the spine. The trick with this is to think about snapping the weight back so that your hands are pretty much right in your crotch, and then pressing the hips forward while the knees press back and you get a triple lockout from the abs, hips, and knees at the same time.
The great thing about a swing is that you can generate significant force without the use of a heavy weight, which is great for those who may have a history of spinal weakness or injury. That doesn't mean it will be easy, just that it will be easier than a conventional deadlift.
From there we can branch out into a sumo deadlift. This has a wider stance and focuses more on the hips moving through more of a frontal plane of action than a conventional deadlift. The benefit of this is the bar is again closer to the center of gravity, which reduces the impulse on the spine. The big issue here is keeping the hips externally rotated and abducted enough to keep a line of action straight through the knee so that the knee doesn't get beat up. It is tougher on the hips, so don't go crazy on the weights, like this, unless you want to compete in powerlifting.
From here we can go into a trap bar deadlift if you have a trap bar available. The benefits to these are they place the hands to the sides instead of in front, which again makes the axis of the load line up closer to the center of gravity and reduces the nastiness on the low back.
From here you could go to a conventional deadlift, but I already showed that, so instead let's look at a 1-leg good morning instead.
Finally, after all's said and done, don't break your back unloading the bar.
In this video PTDC Coach Bret Contreras shows you a brilliantly quick and effective way to strip the bar after a heavy deadlift session.========This video is property of Bret Contreras (Fitness Page) and is used with permission. Learn More about Bret at www.bretcontreras.com and subscribe to him on YouTube at www.theptdc.com/bretcontreras========For more info about the PTDC, go here:http://www.theptdc.com/about-us
Posted by Personal Trainer Development Center on Monday, June 8, 2015
With so many options to help you determine how to develop and expand your hip hinge without ruining your spine, you can have a veritable field day making your cheeks scream at you all the way down and up off the toilet tomorrow. Don't say I didn't warn you.