Core training can get pretty confusing for everyone. Yes, even for personal trainers. There tends to be two conflicting perspectives. One is from the client who believes that sit-ups and crunches are the answer to removing their gut and producing something like:

Then there’s us, the trainers, who have a completely different perspective and pictures something more along the lines of:

Unfortunately, the majority of trainers struggle to bridge the ideas behind these two images. In other words, clients want to “feel the burn" in their abs, but you will have a hard time convincing them that they need “functional movements” to help them build a strong core and visible abs, not endless sit-ups and crunches.
So in order to effectively combine what the client wants with what the client needs, let’s first all get on the same page about the core.
Let’s agree that the core isn’t just about training abs
The six pack itself is not your core. The core is your entire torso, consisting of the pelvic floor muscles, transversus abdominis, multifidus, internal and external obliques, rectus abdominis, erector spinae, and the diaphragm itself. But you probably already knew all of that.
However, do you know why clients really want core training? Most will tell you they want “visible abs”, thinking that is also having a really strong core. We know that is far from the truth, but do they?
In many cases, they want abs to be free from pain. The majority of clients coming to you will have tight hips and/or lower back pain. Many of these issues oftentimes involve their likely weak erector spinae that arise from too much sitting.
Sitting (at desks, at home, or in the car) keeps us in a constantly flexed position at the hip, which keeps hip flexors in a flexed and shortened position. Over time, continued sitting creates more and more tightness in the hip. Further, when people sit, they probably have rounded shoulders and back and likely no firm support on the lower back.
Protecting and strengthening the erector spinae by training the core properly can help your clients overcome these issues and strengthen their core (just like they wanted!)
The hierarchy of core training
Now we get to the actual nitty gritty of training your client's core. But it's not having them do planks or standing on BOSU balls.
After many years of personal experience and studying under some great coaches, such as Luka Hocevar, Joe Defranco, Mike Robertson, the guys with FMS, and many more, I’ve discovered that it’s important to train the client’s core in a specific order of importance.
We’ll get into more details soon, but teaching your client safe and effective core training in this manner helps them build a strong, functional, and visible core. Below are the principles of core training, in order of importance (starting with the most important).
* Breathing
* Bracing
* Anti-Movement
* Flexion
* Loaded Carries
With this, understand which exercises and movements are the most important for your clients to work on and implement them first (hint: start with breathing).
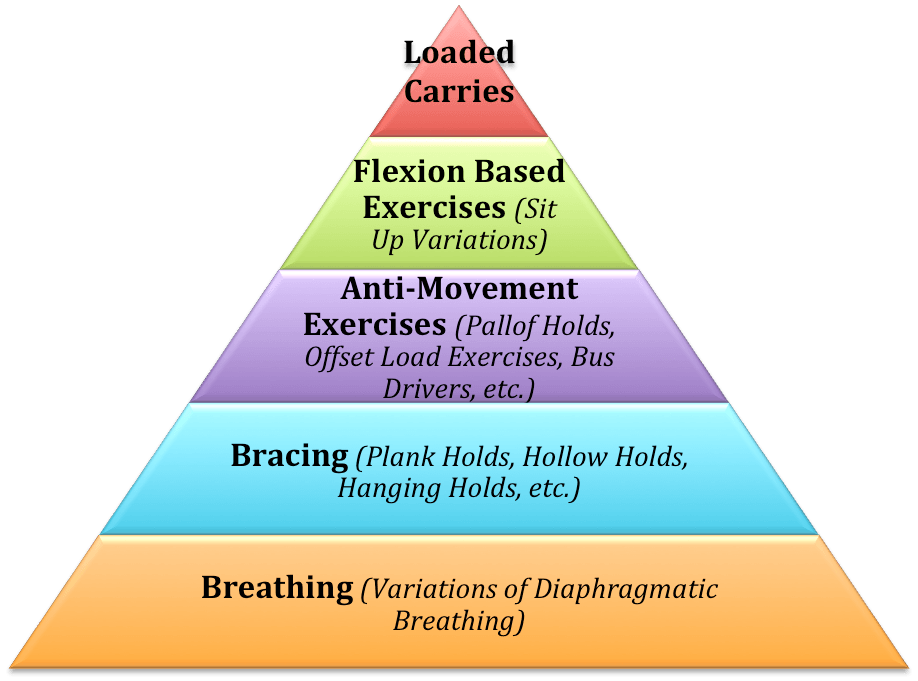
The best way to think about building the core is to imagine yourself building a physical structure. We start with the bottom layer, the foundation, which keeps the structure strong and stable. The same goes for our core: breathing is our foundation.
Just remember that this is the ideal. It won’t be a perfect situation with every client. This also doesn’t mean that just because a client hasn’t mastered diaphragmatic breathing they cannot ever have a plank in their training. If possible, I encourage you to start with building the foundation--their breathing--and move up the pyramid as they nurture the appropriate skill and strength in each level.
But wait a minute, how can you tell when to move on?
Unfortunately, there’s no way to “keep score.” There aren’t hard guidelines like the FMS, so this will come down to mostly your best judgement (which gets better as you work with the person longer).
My suggestion is to overly communicate things and measure their progress, like so:
* "When you’re practicing the breathing, do you feel it more so in your lower abdominal region or still up in your chest?” (Lower ab would be the correct answer.)
* “Have your inhales and exhales gotten longer since we first started?” (Answer should be yes.)
* “During the plank hold (bracing), do you feel it in your abs now or still very much in your lower-back? Are you holding the plank for longer than before?” (Answers are abs, yes, and longer.)
* “During the anti movement exercises, have you increased resistance or weight used? Longer duration? Feel stronger?” (Yes, Yes, Yes!)
* “Can you perform more sit ups than before? Have you loaded your sit ups and flexion based movements?” (Definitely!)
* “When you do your loaded carries, are you using heavier weights or walking for longer distances?” (Yes to both!)
So when you see your client is clearly progressing, move them onto the next level. And remember, you can run through breathing techniques at the beginning of their session and still have a plank in there, even though they haven’t mastered breathing.
Now let’s move onto practical application of these core training principles.
Diaphragmatic breathing
Before you give your clients cool exercises, you should have them practice their breathing.
Okay, breathing isn’t cool and sexy for the client, but they must understand that it has a huge influence on better posture, challenges the deepest core muscles we have, works our central nervous system, builds strength in our pelvic floor and abdominals, and releases tension in our chest, shoulders and neck from breathing improperly.
They may not necessarily care about all that, but again, breathing is the foundation. Let’s take the video below, for example.
Pay special attention to his application of this in the squat. Breathing drills, such as the one described below, are an easy thing to add into a client’s warm-up and something they can even practice at home when they’re not with you.
Cue checklist:
* Have your clients start their warm-up by lying on their back.
* Put their feet up on the wall in a 90-degree knee flexion.
* Keep them calm and relaxed, as some can get too worked up if they’re really inefficient with their breathing which can create anxiety or a sense of struggle.
* Place their hand on the lower region of their stomach, just above their hip flexor. This is a good place to press lightly against, even tapping helps, to give them some external feedback, like a marker to breathe into.
* Instruct the client to inhale very slowly, filling that pocket up against their hand, hold at the top for 1-2 seconds, and finally exhale out as slowly as possible attempting to exaggerate the duration of the breathe.
* While exhaling, cue them to pull their ribcage downward toward their waistline. If you’re comfortable with the client, you can cue them with your hand by gently guiding their ribcage down. That’s one rep.
* Perform anywhere between 5-10 reps.
You know your client is progressing when their inhalation and exhalation get longer and longer. However, even if they get better, you shouldn’t neglect continuing to reinforce consistent and good practice.
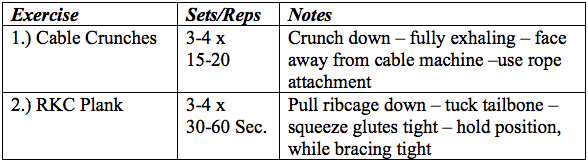
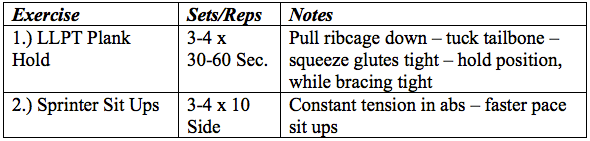
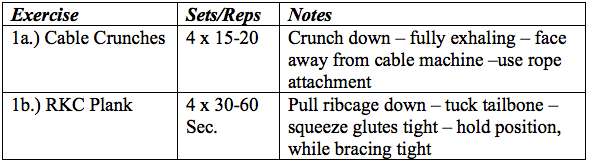
Bracing
Bracing exercises engage the whole core and have the biggest payoff in strength. They’re also very simple. Think of bracing as creating tension throughout your body and within a stable position, like a plank. Check out this video by Bret Contreras for one of my favorite plank variations.
Cue checklist:
* Start in a prone position.
* Your client can get into a stable position on their elbows, with one hand and both feet, or with two hands and one foot propped up.
* Keep your client in a posterior pelvic tilt by telling them to squeeze the glutes as hard as possible.
* Brace by telling your client to contract their abs and hold it.
Doing the plank and similar bracing exercises creates tension isometrically. And by practicing it, your client becomes aware of muscular contractions in their core, resists external movements or force, and most importantly, protects their body, particularly their lower back, from moving very heavy weights.
Anti-movement exercises
Now we move onto the sexier sounding topics: anti-movement exercises are another form of bracing and creating internal tension, but these exercises use external movements, or resistances which try to force us out of a certain braced position. Here’s an example:
Basically, it’s a leveled-up plank. It’s important, however, that you do not give a client difficult anti-rotation exercises when they can’t even plank for longer than 30 seconds with proper form.
Anti-rotation exercises can be as simple as having your client do a kettlebell squat in an offset racked position or holding a dumbbell on one side instead of both. When weight is distributed on only one side, it forces the body in a certain direction and it’s the core’s job to avoid that rotation. Some examples of challenging anti-rotation exercises include:
Landmine bus drivers
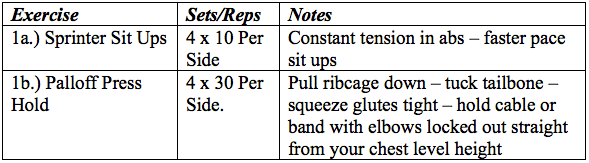
Pallof press
Pallof hold
Cue checklist:
* While your client is pulled toward the side of resistance, they may let their hips or thoracic spine slightly rotate. Cue your client to pull their ribcage down.
* Keep their arms directly ahead of them, while “crushing” the handle to create total-body tension.
* Tell your clients to squeeze their glutes and grip the floor with their feet.
If these cues are still giving your client problems, you may need to lighten the resistance of the band, cable, or weight being used. The goal is to execute with great form for the time given, not leave them shaking during the entire exercise.
Flexion-Based Exercises
You know flexion-based exercises as sit-ups and their variations. And while everyone knows what they are, most people botch the how.
Ask your client to do a sit-up and most likely they’ll just attempt to sit up off the floor and hyperextend their lower back. That’s no good. When you coach it, try having them pull their ribcage down and exhale as they perform a sit-up. This increases their mind-muscle connection and boosts the benefits.
Remember, if we don’t nail down the foundation and the principles below this on the pyramid, then these will be much less beneficial to our clients’ physique and strength. Here are some examples:
Kneeling cable crunch
Sprinter sit-ups (higher rep range)
Weighted sit-ups on a decline bench
Cue checklist:
* Have your client focus on exhaling their breath out as they contract their abs.
* Make sure they control the sit-up or crunch, even if they have to slow down to control the entire tempo of the movement.
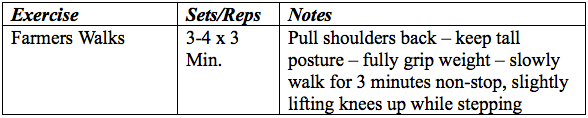
Loaded Carries
Even though this lies at the peak of the pyramid and is the “smallest” section, it is still a very important part of every client’s regimen.
Loaded carries are exactly what they sound like. You walk while holding heavy weights on one or both sides. Your client can do heavily loaded shorter distances or lighter loads while walking a very long distance. These loaded carries are not only a great core stimulator, but they’re also a total-body exercise. Depending on the variation, they can light up the shoulders, traps, rhomboids, lats, arms, and of course, the entire core.
Here’s a great video example:
Cue checklist:
* Grab a pair of heavy kettlebells or dumbbells, but not so heavy that they compromise your client’s posture and positioning.
* Tell your client to stand tall and pull their ribcage down to get in a great posture. Cues: “pull the ribcage down toward your waistline” and “pull shoulders back, by pinching directly between your mid scapula area” (this will activate not only the upper trap, but the mid and lower as well).
* Walk while creating as much internal tension in your client’s core, arms, upper back, etc.
* Avoid rounding the back, hunching or protracting their shoulders, or losing grip on the weights.
In most cases, we don’t want to walk too fast. Some variations can be done in a faster yet controlled tempo. For the average person or anyone new to this, slow down and imagine walking a few steps slower than they normally would. When the client is walking, slightly bring the knee up (just below parallel) to get a small glute stretch in each step.
Don’t over complicate, overwhelm, or over-think this! It’s simple. Here are a few more loaded carry variations and exercises to try:
Trap bar farmer’s carry (courtesy of Dr. John Rusin)
Single-arm farmer’s carry (via Dan John)
Core “finishers” to make your clients excited to work out their core
“Core finishers” can be added to the end of your clients’ strength training days or on their cardio days as something to start the session with.
I’ve broken them down into Levels 1, 2, and 3. The rationale is, if the client has never really implemented serious core work or is a beginner in the gym, start them on Level 1. Intermediates can jump to Level 2; for more advanced and core specialization, jump to level 3.
Use your best judgement and the questions from earlier to determine whether they’re ready for the next level. As they get better and stronger, you can move them onto the next level of core training and the next level of programming below.
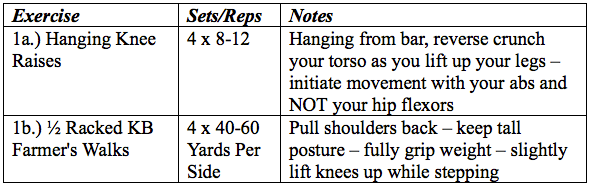
Level 1
Day 1

Day 2

Day 3
Level 2
Day 1
Day 2
Day 3

Level 3
Day 1
Day 2
Day 3