
An effective fitness trainer understands the need for personalized programming for clients, but it can be time-consuming. On the other hand, a good training program design template frees up time for other things, like marketing your services, building your personal training business, and working with clients. You might even find some time in there for yourself because work-life balance is just as important as growing your business.
Why use a template to create strength training programs
Strength training can help improve bone health, making aerobic activity more productive, reduce the risk of injury, and promote healthy aging. No two clients are the same, though. That means fitness coaches must take the time to understand the needs of their clients and build a strength training program around their fitness goals.
It might sound like working from a template interferes with individualizing these programs. That’s why I call this the “plug-and-play” method. You streamline the process by using a standard framework for each client and then personalize it as needed.
This training program design template, made and kept on Excel or Google Sheets, is flexible enough to individualize programs for hundreds of athletes. It is one of my most important personal trainer tools. I don’t have to write a new program for every client from scratch. It allows personal trainers to spend more time doing the work up front.
There is one caveat, however. It may not work well if your client niche is a competitive strength athlete, such as:
- Powerlifters
- Olympic lifters
- Bodybuilders
- Strongman competitors
It’s a practical choice for the field sports athlete or average desk jockey who doesn’t need fancy periodization schemes. It works well if you’re trying to figure out how to create beginner client workout programs, too.
Using a training program design template allows you to develop each one efficiently but make changes when necessary.
Creating a basic training program design template
Follow these steps to create your basic template.
Step 1: Categorize all strength exercises into movement patterns
This first step goes back to Australian strength coach Ian King’s teachings, which were well ahead of their time in the ’90s. While everyone else talked about body-part splits and isolation exercises, King approached strength training program design by dividing exercises into functional movement patterns.
When you categorize the exercises in this way, it’s easy to tell when a program is off balance. So, for example, if you have programmed three upper-body pushing movements in a row, you can easily add more pulling exercises to balance out the program.
What are functional movement patterns?
Functional fitness exercises can train the muscles to do everyday activities efficiently. Using functional movement exercise programming allows you to break down each activity into one of the following eight movement patterns:
- Power
- Lower-body knee dominant
- Lower-body hip dominant
- Upper-body horizontal pushing
- Upper-body horizontal pulling
- Upper-body vertical pushing
- Upper-body vertical pulling
- Core
New neural pathways form every time the human body coordinates the muscles to complete these movement patterns. The more your clients perform the actions, the more ingrained and efficient the pathways become, and the greater the benefits.
Working within these functional movement patterns ensures the body's engagement to build optimal and usable strength.
Next, take the exercises you use in your strength training programs and insert them into their applicable categories. For example, activities in the power category would consist of:
- Jumps
- Medicine ball throws
- Olympic lift variations
Exercises in the lower-body knee-dominant category would include:
- Back squats
- Front squats
- Box squats
- Split squats
- Rear-foot elevated split squats
- Reverse lunges
- Walking lunges
Meanwhile, upper-body horizontal pushing would include all bench press, push-up, and dip variations. You’ll notice that isolation exercises like curls or triceps extensions don’t fit into any of those eight categories, but we’ll get to that in a minute.
Step 2: Create your training session
I approach my training program design templates with a couple of preconceptions in mind:
- Training sessions should finish within 60 minutes after starting the first working set of the first exercise.
- Every training session begins with a powerful or explosive movement. It doesn’t matter whether you train sports athletes or cubicle workers; training power is mandatory. As we get older, the ability to express power is the physical quality that drops first. In fact, we lose it even faster than we lose strength. Therefore, improving an athlete’s ability to express power should be of the utmost importance and done early in the session while their nervous system is fresh.
- Heavy strength lifts come next because saving them after the high-rep work means your client must do them when fatigued.
Choosing a simple strength training sequence
Here’s a straightforward strength training program workout sequence that enhances explosiveness and builds strength and muscle:
- 1. Neural (power/explosive exercise) – sets 3-6, reps 1-6, rest 2 min. or longer
- 2a. Neural (heavy multijoint exercise) – sets 3-6, reps 1-6, rest 2 min. or longer
- 2b. Neural (heavy multijoint exercise) – sets 3-6, reps 1-6, rest 2 min. or longer
- 3a. Metabolic (assistance/isolation exercise) – sets 2-4, reps 8-12+, rest 30-90s
- 3b. Metabolic (assistance/isolation exercise) – sets 2-4, reps 8-12+, rest 30-90s
- 3c. Metabolic (assistance/isolation exercise) – sets 2-4, reps 8-12+, rest 30-90s
The goal is to start your training sessions with a power exercise that targets the nervous system, move on to heavy multijoint exercises where you can pile on the weights to build strength, and wrap it up with some higher-rep hypertrophy work that gets a nice pump going and keeps the joints healthy.
This training design template works well for a beginner, someone with less than a year of progressive strength training or two years of less focused training. You can create as many templates as you like and use whatever training techniques you think are best for your personal training clients.
Step 3: Determine your client’s training frequency
Work with the client to determine their fitness goals and the necessary training frequency to reach them. Anything less than twice per week won’t do much for strength and performance gains.
On the other hand, your typical fat-loss client or non-strength athlete won’t be devoting over four weekly workouts to achieving their body composition or performance goals. So two to four training sessions per week will hit their sweet spot.
Step 4: Choose your exercises and reps appropriately
Base these on your client’s abilities. Most clients benefit from a power or explosive exercise. Some of my go-to choices include:
- Jumps
- Medicine ball throws
- Olympic lifts
Of course, the average client won’t have the fitness level that warrants Olympic lifts. So instead, sticking with jumps and medicine ball throws makes more sense. The point is to make this determination on a per-client basis.
As a general rule, keep reps low to reduce the risk of poor form and premature fatigue. For example, a fit client might do:
- Olympic lifts – 3-5 sets with 1-5 reps each
- Jumps – 3-5 sets with 1-5 reps each
- Medicine ball throws – 3-5 sets with 5-10 reps each
In the second block of exercises within the template (2a and 2b), we’ll pick two big, multijoint exercises targeting opposing muscle groups in a superset fashion. This allows the client to recover better without dragging on rest periods for too long. Here are a couple of examples:
- In a full-body session, you’d pair an upper-body exercise with a lower-body exercise (e.g., front squats with chin-ups).
- In an upper- and lower-body split, you’d go with a pulling and a pushing movement on upper-body day (e.g., bench press with rows).
- On lower-body day, you’d pair a knee-dominant movement with a hip-dominant exercise (e.g., front squats with Romanian deadlifts).
Pick multijoint exercises that allow the use of heavy weights for one to six reps. Good choices would be:
- Bilateral barbell squat
- Deadlift
- Bench press variations
- Chin-ups
If you don’t feel comfortable with heavy, low-rep maximal strength work, bump the reps to six to eight per set.
The third block (3a, 3b, and 3c) is a tri-set of bodybuilding-style work in the 8-to-12-plus rep range. This includes direct work for the upper back, legs, glutes, arms, abs, or whichever body part you deem requires more attention.
For example, if you’ve got an office worker walking with a slouch, you’d probably want to hammer his upper back with rows to pull his shoulders back into a more neutral position.
Likewise, an athlete with deflated-looking glutes would hit glutes and hamstrings with more volume to help his strength and speed on the field or pitch.
When choosing the three exercises, you can stick with activities that involve several muscle groups, such as:
- Close-grip bench presses
- Push-ups
- Back extensions
- Lunges
You could also throw more isolation into the strength training programs like curls and lat pull-downs. The exact exercise selection doesn’t matter. The goal is to have the right muscles do the work instead of just moving big weights around. Also, to improve general fitness and spur muscle growth.
Step 5: Establish rest periods
We know that the nervous system can take longer than your muscles to recover between sets. Keeping this in mind, you’ll want to keep rest periods longer on blocks one and two (explosive and heavy strength movements), then decrease rest times when you move on to block three (higher-rep hypertrophy work). Here’s the general gist for rest periods:
- For power movements: In Olympic lifts and high-level jumps, aim for 2 to 3 minutes of rest between sets. With low-intensity jumps and med ball throws, around 60 seconds works well.
- For 2a and 2b: 2 to 3 minutes of rest for trainees who can lift heavier weight and are beyond the beginner’s phase. Someone new to lifting weights doesn’t use their nervous system very efficiently and would recover quickly.
- For 3a, 3b, and 3c: Decrease rest periods to 30 to 90 seconds. You don’t need more extended rest when the goal is to build some work capacity and get a nice pump going to finish off a session.
Also, keep in mind that not every power/explosive exercise taxes the nervous system similarly. Two minutes of rest after eight med ball floor slams, for example, would be overkill since it’s not a very neurally demanding activity.
Step 6. Individualizing the program
The great thing about the training program design template is that you're mostly good to go with the program you've created. You can also quickly apply the program to a team or small group training setting. For example, it could be essential when considering how to create beginner client workout programs.
It is flexible enough to allow you to make easy changes to strength training programs. For instance, trainees with mobility restrictions or previous injuries need further consideration and smart modifications. For example, if a client would do better with the dumbbell bench press instead of a barbell bench press because the barbell irritates shoulder muscles, then make the change on the program for this one client.
My hockey players will perform some deadlift by default as their heavy, lower-body hip-dominant movement. However, that doesn't mean every client can pull from the floor with a straight bar as a powerlifter would. Instead, they might do trap bar deadlifts, deadlifts off blocks, sumo deadlifts, Romanian deadlifts, or even landmine deadlifts. The variation we choose depends on the injury history, possible mobility issues, and technical execution with a given variation.
Even when working with an athlete whose lower-back problems prevent specific exercises, choosing something spine-friendly like hip thrusts or back extensions could be an alternative to hit the posterior chain muscles.
These modifications show that program individualization doesn’t mean that each new client requires a training program built from scratch. Instead, all trainees will push, pull, squat, and hip hinge in a balanced program.
Our task is to determine a safe exercise within those movement categories for each client or athlete, then adjust the reps, sets, and rest periods accordingly.
Putting it all together
Here’s what this could all look like in a twice-per-week, full-body, in-season strength training exercise program for a pro hockey player:
Day 1
- 1. Power (neural) – Power clean from hang 4×3, rest 3 min.
- 2a. LB knee-dominant (neural) – Front squat 4×5, rest 2 min.
- 2b. UB vertical pulling (neural) – Weighted chin-up 4×3, rest 2 min.
- 3a. LB hip-dominant (metabolic) – Weighted 45-degree back extension 3×10, rest 75s
- 3b. UB horizontal pushing (metabolic) – Dumbbell bench press 3×8, rest 75s
- 3c. Core (metabolic) – Ab wheel 3×10, rest 75s
Day 2
- 1. Power (neural) – Depth jump 3×5, rest 2 min.
- 2a. LB hip-dominant (neural) – Trap bar deadlift 4×3, rest 2 min.
- 2b. UB vertical pushing (neural) – Push press 4×5, rest 2 min.
- 3a. LB knee-dominant (metabolic) – Dumbbell split squat 3×8, rest 75s
- 3b. UB horizontal pulling (metabolic) – Single-arm dumbbell row 3×8, rest 75s
- 3c. Core (metabolic) – Standing Pallof press 3×8, rest 75s
And here’s an example of a twice-a-week strength training program for the average personal training client who wants a lifting schedule to lose fat. Some exercises, set and rep schemes, and rest periods match their current fitness levels, needs, and lifting experience.
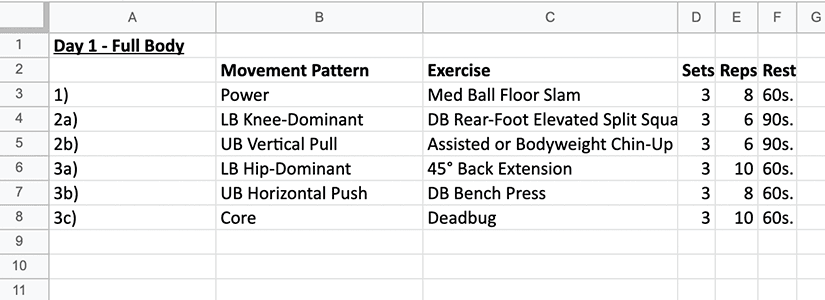
Day 1
- 1. Power (neural) – Med ball floor slam 3×8, rest 60s
- 2a. LB knee-dominant (neural) – Dumbbell rear-foot elevated split squat 3×6, rest 90s
- 2b. UB vertical pulling (neural) – Assisted or bodyweight chin-up 3×6, rest 90s
- 3a. LB hip-dominant (metabolic) – 45-degree back extension 3×10, rest 60s
- 3b. UB horizontal pushing (metabolic) – Dumbbell bench press 3×8, rest 60s
- 3c. Core (metabolic) – Dead bug 3×10 per leg, rest 60s
Day 2
- 1. Power (neural) – Box jump 3×5, rest 60s
- 2a. LB hip-dominant (neural) – Deadlift off blocks 3×5, rest 90s
- 2b. UB vertical pushing (neural) – Half-kneeling landmine press 3×6, rest 90s
- 3a. LB knee-dominant (metabolic) – Dumbbell split squat 3×8, rest 60s
- 3b. UB horizontal pulling (metabolic) – Single-arm dumbbell row 3×8, rest 60s
- 3c. Core (metabolic) – Standing Pallof press 3×8, rest 60s
I’ve included a spreadsheet with pre-made programs for the following training goals and weekly training frequency. You can experiment with the training program design templates as you see fit.
Checklist for client individualization:
- Categorize movements you frequently use with your trainees
- Determine training frequency
- Plug in the exercises you want
- Adjust reps and sets
- Tweak rest periods
You now have a way of individualizing your program, a lot quicker and more simply, for each client or athlete that stays true to your training philosophy.
And the best part is, clients will feel elated because your program delivers measurable results fast.