

The squat is an excellent exercise to help build and test your client’s strength. Unfortunately, many clients struggle to perform it pain free, leaving personal trainers unsure of what to do or how to address it. The answer is not so simple because the issue is complex. For one thing, no two trainees have the same anatomy to squat the same way. It’s up to the trainer to acknowledge this and properly assess the individual’s ability to squat in the first place.
If you have a client who is having trouble squatting without feeling pain or discomfort somewhere, there are two likely reasons: poor mobility or poor coaching.
ALSO READ: The Real Reason Why People Must Squat Differently
When your client has mobility limitations in their hips and ankles, they may have trouble squatting pain free. For example, if the hips don’t possess sufficient internal or external rotation, many people will feel a “pinch” at the bottom of a deep squat.
Additionally, if your client doesn’t have sufficient ankle dorsiflexion, compensations, such as excessive mobility, can occur at the hip and low back, which can cause pain. Address these before loading into painful ranges! You can improve squat mobility with a few drills such as:
Bench hip internal rotation mobilization
https://www.instagram.com/p/BKAxchQBiwh/
Standing lunge on table
https://www.instagram.com/p/BKgWUniAfbd/
Kneeling hip adductor mobilization
https://www.instagram.com/p/BEvdN-ENERG/
Yes, it’s important to work on improving mobility, but sometimes all it takes to work around mobility restrictions is more simple: alter the stance (go wider or more narrow), foot placement, and bar position. We’ll get to this more in the tips section below.
Another reason someone may have trouble squatting pain free is proper coaching, or lack thereof. First, it’s important to be able to properly assess someone’s ability to squat and then coach it with the right cues for proper form. So let’s get to some actual coaching tips to help your client squat pain free.
5 tips to help your client squat pain free
Note that pain or discomfort during the squat is certainly an area for concern, and under some circumstances, should require a referral out to a licensed health-care provider such as a physical therapist.
However, if the client has already filled out a questionnaire such as the PAR-Q and YOU to ensure he or she is fit to exercise, sometimes very simple adjustments in squat form are all that’s needed for the client to squat pain free. If after making the form adjustments mentioned below and the client still presents with pain during the squat, refer out!
Tip 1: Avoid excessive stance widths
One of the biggest factors of a pain-free squat is stance width. The foot placement sets up the foundation for a solid squat, and it must be suited to the individual to maximize safety and performance. Generally speaking, most people will feel comfortable with their feet shoulder-width apart. I define this as a “moderate” stance width. Avoiding an extremely wide stance or an excessively narrow stance is one key to pain-free squatting. Here’s why.
Excessively wide stances that are favored mainly by geared powerlifters require a substantial amount of hip mobility to squat without pain. With a wide stance, the hip joint and inner thigh musculature must be flexible and mobile enough to allow the individual to abduct the femur and push the knees out to be in line with their toes. Unfortunately, many average fitness-goers lack this.
If your client tries to squat with a wide stance and can’t sufficiently get the knees out, their hips will be placed in an internally rotated position at the bottom of the squat, which can lead to a pinching sensation in the hip. Because of their bony makeup within the hips, some people can squat best with a wider stance, but going too wide may present problems for non-powerlifters.
On the other side of the coin, too narrow of a stance can also lead to pinched hips or cause issues in those predisposed to knee pain. With more narrow stances, it can be difficult to heavily recruit the posterior chain, as the knees tend to move excessively forward. For most healthy people with no predisposition to knee pain, there’s nothing wrong with anterior translation of the knee.
When you are teaching someone how to squat for the first time, I recommend cueing a more moderate stance, which is shoulder-width apart. If that doesn’t feel comfortable, then you adjust stance width and a “toes out” angle.
Tip 2: Knees in line with toes
To be clear: I’m not referring to anterior translation of the knees over toes, a.k.a. knees going too far forward, past the toes. This is necessary for high-bar squats and front squats. Mainly, I’m talking about this from a medial lateral perspective. Keeping knees in line with toes will minimize tibial rotation at the knee, as extreme rotation of the tibia has been shown to affect patellar tracking and cause unwanted varus (knees out) and valgus (knees in) moments.
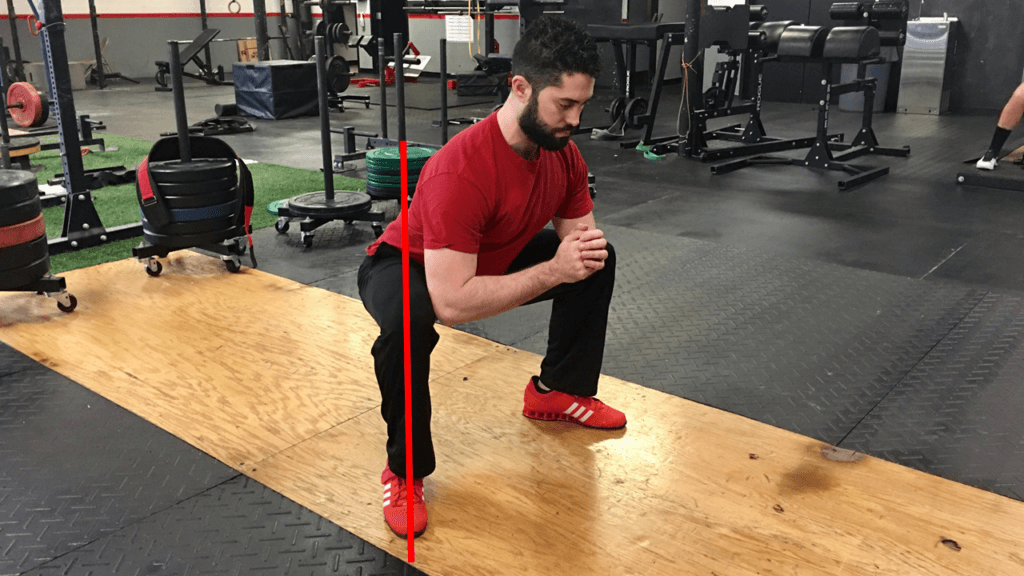
Regardless of stance width, the knee should always track over the second toe in order to squat pain-free.
Many people use the “knees out” cue to ensure proper knee tracking, but while beneficial, it should only be used for clients whose knees tend to cave in. It is possible to shove the knees out too far and cause the client to squat with a supinated (excessively arched) foot--something we also don’t want. Regardless of stance width, the goal is to make sure the knee is in line with the toes.
Tip 3: Brace the core appropriately
Back pain is another common issue that prevents people from squatting heavily. You want to ensure that proper bracing and breathing are occurring.
Oftentimes, many coaches cue “arch your back” during the squat. They believe this cue is a sufficient way to maximize spinal safety, but this couldn’t be further from the truth. By having your client arch their back, their pelvis is set in excessive anterior pelvic tilt, limiting hip mobility, and can further contribute to that dreaded pinch many feel in their hip at the bottom of the squat.
Furthermore, there’s an additional tendency to rely on the low-back muscles to stabilize the spine. Under a loaded barbell, that’s not enough to maximize spinal safety and prevent low back pain. To do that, we want to effectively brace the core in a 360-degree manner to engage as must of the musculature as possible. First, find a neutral spine (avoiding extreme anterior or posterior pelvic tilt), take a big breath of air into the belly, and hold it the entire time during the squat. This increases intra-abdominal pressure to help stabilize the spine. A good cue to use for this is to “lock the ribcage down on the pelvis” to prevent rib flare, anterior pelvic tilt, and promote a pain-free squat.
Tip 4: Choose the optimal squat variation
A key component to pain-free squatting is utilizing the client’s “optimal” squat variation. Choosing this will be determined by the client’s prior injury history, body anthropometrics, and personal preference.
As I pointed out previously, it may be easiest to start the client in a moderate, shoulder-width stance. If they can do this with good technique, this makes your job a little bit easier. When pain enters the equation, however, the video below demonstrates what you can do:
For those with a history of knee pain or limited ankle range, go with a slightly wider stance and a low-bar position. This not only requires less ankle mobility to perform correctly, it also heavily recruits the posterior chain (glutes and adductors) to help take pressure off of a cranky knee. The forward torso angle afforded by this variation helps limit forward motion of the knee, and thus shear stress. Such stress is not tolerated well in those with a history of knee pain.
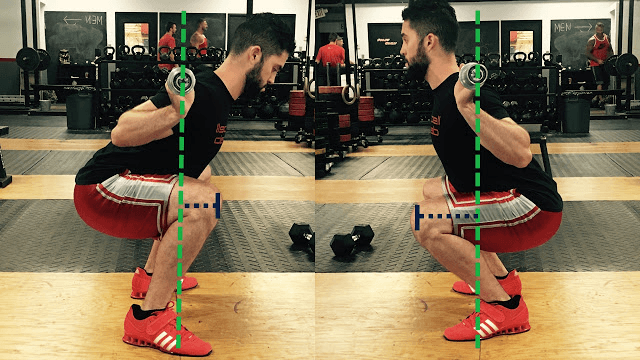
Due to decreased forward knee migration, the low-bar squat position as shown on the left is usually more comfortable for clients that are predisposed to knee pain.
Some of your clients might feel hip pain. Although a lot of this is dictated by the anatomy of the hip and socket, most will feel more comfortable with a slightly narrower stance and either a high-bar squat or front squat variation. That’s because the client maintains a more upright torso, decreases stress on the hip joint, and essentially gives it more room to “breath,” so to speak, to avoid that pinching sensation.
If your client has a history of back pain, one variation may not be better than another. If that’s the case, just ensure that the client is bracing properly and warming up sufficiently (more on this next) to prepare their spine for heavy loads.
Tip 5: Ramp up your sets
You don’t have to spend half an hour aimlessly foam rolling (which doesn’t break up any adhesions or scar tissue anyway) or trying to activate your client’s glutes—just try squatting for crying out loud! There is no better way to prepare for heavy squats than to slowly ramp up the movement pattern itself.
I’m a firm believer that regardless of whether you squat 135 or 405 pounds, the first set of squats should always be performed with an unloaded barbell. This is paramount to start grooving the squat pattern. Far too many people don’t perform enough warm-up sets prior to their working sets, which can lead to the working sets feeling less than optimal.
Let’s say your client’s working sets are 315 pounds for 5 sets of 3. A proper warm-up may look like this:
45 x 10
135 x 3
185 x 3
225 x 3
275 x 3
315 for 5 x 3
The key during the ramp up phase is to gradually expose your client’s body to increased loads, while minimizing fatigue to increase performance and pain-free squatting. This is why I don’t recommend performing higher reps during the warm-up phase, as this could promote fatigue before the working sets are even reached.
Generally speaking, ramp up sets should be in the 3-5 rep range regardless of what reps you are performing in your working set. Additionally, the amount of ramp-up sets can range between 4 to 8, depending on how much weight is used for the working sets. Remember, the goal is to prime the body to perform heavy lifting, not tire it out before the real work begins.
A painful squat is never fun, but often times slight modifications in stance, toe out, bar placement, and loading scheme are all that’s needed to promote pain-free squatting! If your client presents with this issue, try these five simple tips first. If the client still has pain after these modifications, a referral out to a licensed health-care professional is warranted to rule out serious pathology. Happy squatting!